CLICK HERE FOR FREE BLOGGER TEMPLATES, LINK BUTTONS AND MORE! »
Showing posts with label clothing. Show all posts

Wednesday, February 8, 2012

Boys Valentine Airplane Tee

I made THIS cute dress for my daughter for Valentine's Day and was trying to find something cool to make for my son.  Ruffly hearts were just not going to cut it for an 8 year old (almost) boy . 

A while ago I found THIS neat shirt on Pinterest, and it became my inspiration for this project.

I made the airplane do a heart loop.  Instant Valentine tee.  An, 8 year old approved, cool, Valentine tee.  YES!


The airplane is made from off white cotton fabric (about 8 pieces stacked together), stitched along the edge for detail to make it look like a paper airplane.  And I hand stitched the airplane's heart loop with black embroidery thread.  This project only took about 30 minutes to complete and didn't cost me anything since we used a plain red tee we already had and I already had the fabric and thread on hand.


Saturday, August 6, 2011

Back to School - Repurposed Shirt

Every year before my kids head back to school, I drag the big totes out of the eaves that contain all their fall and winter clothing.  We pull everything out, try things on, and see what we might need to replace since we've outgrown things. 

Trying to save a little money this year, I decided to look through the pile of outgrown clothing and see if there was anything I could repurpose.  One thing that caught my eye, was this simple but cute penguin shirt.  My daughter and I both loved this shirt, but the long sleeves had become too short on her this year.  But paired with the sleeves of another too small shirt, we might be able to get another season of life out of it.


So, I took the blue shirt and cut the sleeves off.  I cut a straight line across at the arm pit.


Next, I cut the sleeves off the penguin shirt, leaving about 3/4 of the original length of the sleeves.


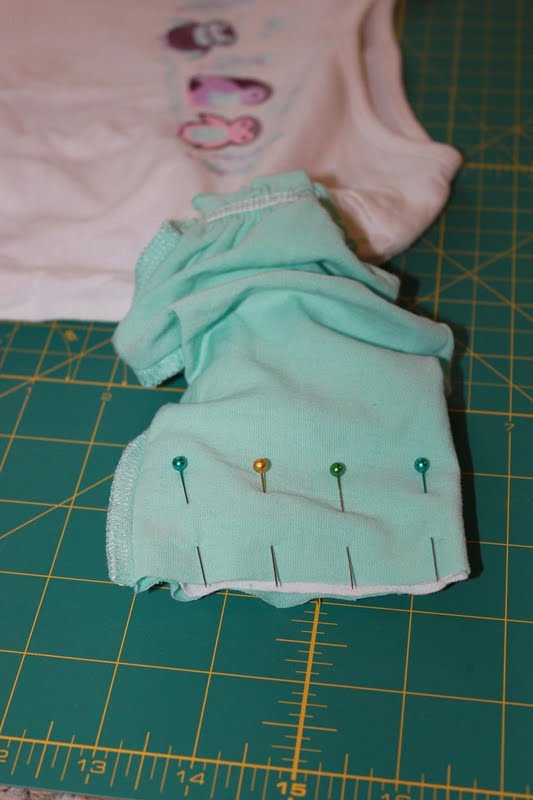
Then, I turned the blue sleeves inside out, slipped them onto the white sleeves and pinned them in place.


I used a straight stitch to sew the sleeves together.  When I was finished, I removed the pins and pulled the blue sleeves down and right side out.


Although the length of this shirt was still ok, I thought it couldn't hurt to add a little hem from the blue shirt to match the blue sleeves we added.  So I cut the bottom hem off the blue shirt, plus a few inches.


Again, I pinned this into place along the bottom hem of the white penguin shirt, and sewed the two hems together with a straight stitch.


I think it turned out really cute!  And I'm glad we were able to save another shirt for another year!


Sunday, June 5, 2011

Freezer Paper Stencil Shirts

I got together with two friends the other night to make these freezer paper stencil shirts for our big kids to wear on their last day of school.  Freezer paper stencils are really cool and pretty easy to do.  You can see the details on THIS POST when I made one for my son when he participated in the Race for Education at his school.  The first time I used a Xacto knife to cut out all the letters (that was a lot of work!), but this time around I had a Cricut to help me out!

The front says, "Look out 2nd Grade Here I Come!"  and the back says, "Thanks for a Great Year Mrs. ____!"  The kids are going to wear these on the last day of school and have all their friends sign their shirt.  We did this last year and it was a fun keepsake!


I also made one for my daughter who is excited about starting Kindergarten in the Fall!


Monday, May 9, 2011

Matching Easter Outfits

Sorry this post is so late!  I've been having so much trouble posting pics to my blog, but have finally found a pretty simple work around solution.


I made matching Easter outfits for the kids this year. They were both pretty easy to make and I'm really pleased with how they turned out. Don't mind the color changing in my pics - I just couldn't seem to get the lighting right.

For my son, comfort was key. So, I took a plain green tee and added a tie applique. He looked quite handsome!


And for my daughter, girly and twirly is her thing, so I made her a tiered twirl skirt with a matching appliqued tee. She looked just darling and spent most of the day twirling in the grass.


Overall, I'm very please with how their outfits turned out, and even happier that they aren't too fancy to wear again.


Wednesday, April 13, 2011

Handmade Sparkly Shoes - Take Two!

Last summer, I made my daughter these sparkly canvas shoes.  Sadly, those shoes got too small and since it was absolutely necessary to have another pair, we set to work right away!

We used her pink Converse tennis shoes.  She wears these shoes EVERYWHERE!  But she didn't mind if we changed them up a bit, adding a little sparkle.  We threw them in the wash before starting - don't they look brand new? 


Using my favorite adhesive, E-6000...


...we adhered some colorful flower shaped rhinestones.


These are not nearly as sparkly as our first pair, but she loves them just the same.  And did you know E-6000 even holds up in the mud? 


Thursday, March 31, 2011

Practice Peasant/Prairie Dress

I made this dress for my daughter.  I called it my practice dress because I was hoping to make something similar for her for Easter.  But, I didn't want to mess up and chance wasting all the new springy fabric I had just bought, so I used some fabric I already had on hand and kind of whipped this up.

It's a combination of a peasant style top, apron prairie dress and tiered twirly skirt all put together.  This dress took me about a day and a half, but that's because I didn't have a pattern and was kind of winging it.  But I think it turned out looking pretty darn cute, if I do say so myself!

If I can manage to get my photos and notes in order, I just might have a tutorial to go with this too!


Sharing my creation at the following blogs:


Tip Junkie handmade projects

Saturday, March 26, 2011

Pirate Girl Skirt

My kids love that new show on Disney Junior, Jake and the Never Land Pirates.  My daughter especially loves that there is a girl pirate and has been dreaming of being a pirate for next Halloween.  But, after seeing this super simple tutorial over at Filth Wizardry, I knew I would have to get her exploring now with this adorable pirate skirt!
I started with 2 bandanas, that I purchased from Joann's.  I washed and air dried the bandanas, then ironed out the wrinkles.  I used a large plastic lid (about 5 inches wide) to draw a circle in the center of each bandana.
 

Next, I cut a line from the center of one of the sides to the circle, and cut out the circle.  Save those circles - you can put them to use later.
 

Then, I put the bandanas on top of one another right sides together, and stitched along one of the sides where I cut.  When you open them back up, you can see the skirt starting to form, with one side hem stitched and the other side hem still open.
 

I used one of my husband's old ribbed t-shirts and cut about 6 inches from the bottom.  This is going to make the waist.  I cut along the shirt's side hem so I had one long piece and not a tube, and started pinning it to the top part of the skirt, right sides together.  Then I ran a straight stitch.
 

I used the original hem from the bottom of the shirt to run my elastic through for the waist.  Once the elastic was in place, I folded the bandanas back over, right sides together, and ran a straight stitch on the other open side hem all the way up through the waist.

It looks so adorable and was so easy to make!  I used one of the extra circles of bandana fabric and appliqued it onto the front of a tank top.  I think we will try to make some pirate swords this weekend as well.  Please be sure to check out Filth Wizardry for her simple step by step tutorial, and make a pirate skirt for your own little swashbuckler!

Friday, January 28, 2011

Valentine Fleece Boa Scarf

I recently saw these adorable fleece boa scarves over at my friend Laura's blog, Come Together Kids.  She provided a great tutorial on how to make these, so I knew I would have to give it a try.  I decided to make one for Valentine's Day, in red and white.  My daughter wanted to use hers for dress up play. 

I started off with 3 pieces of lightweight cotton fleece, 2 red and 1 white.  Each piece was 6 inches wide and 48 inches long. 


I made two straight stitches down the middle of all three pieces.


Then, using my rotary cutter, I cut a one inch fringe on each side.


This turned out so cute and was so easy to make!  Thanks again Laura for sharing your tutorial with us!

Tuesday, November 9, 2010

Freezer Paper Stencil

Have you heard of freezer paper stencils?  They are just about the coolest thing ever!  I've seen them around all over the blogging world and just recently had the chance to try them out. 

How it works, is you trace your design on the plain side of the freezer paper and use a Xacto knife to cut it out.  Then you iron the freezer paper onto your piece of clothing, shiny side down.  After making sure all the edges are ironed down well, you fill in the stencil with paint.  Fabric paint gives the best result, but acrylic craft paint works pretty well too.  When the paint is dry, you peel off the freezer paper and that's it!

I used a freezer paper stencil to create this shirt for my son's school fundraiser at school, Race for Education.  I think it turned out really well, and he'll look totally cool running to help raise money for his school!


Monday, October 25, 2010

Halloween Pillowcase Dress

I made this pillowcase dress for my daughter for Halloween. I saw this Hello Kitty fabric at my local Joann's and knew I had to make something super cute out of it for her. I added some cute detail, like the purple ribbon ties at the top and the pom pom trim along the bottom. I used some of the leftover pom pom trim to add to the bottom of a pair of black leggings. And used some leftover fabric and ribbon scraps to make the headband.

She has gotten lots of compliments, but best of all - she loves it!


Sharing this cute craft: