
Wednesday, November 30, 2011
Handprint Quilt
I just wanted to pop in to share a special gift I made with the help of some fantastic students and a few helping hands of fellow moms. This handprint quilt was my first quilt and I think it turned out rather well! A special thank you to Kristen who posted THIS awesome, and very easy to follow tutorial on her blog!

Monday, October 3, 2011
Halloween Costumes
Hi everyone! If you are reading this, I appreciate you sticking around! I haven't posted in quite some time because getting ready for and starting life with two kids in elementary school has actually been pretty hectic. I took on the responsibility of being room mom for both of my children's classes, volunteered to be our school representative for the Trick or Treat for Unicef program, and signed up both kids for after school activities. So, it's been a little busy trying to get used to our new schedule.
I just wanted to stop in today to share the Halloween costumes I made for my kids' this year. I can't believe I got them done this early! My son wanted to be a knight and my daughter wanted to be a pirate princess.
For the knight costume, I used McCalls pattern 5500 to create the "chainmail" shirt, tunic, helmet and shoulder armor. I created the belt, sword sheath, and boot covers (not pictured) on my own.


For the pirate princess costume, I made the shirt using the peasant blouse tutorial HERE and made the bandana skirt using the tutorial HERE. I made the striped bloomers and belt on my own, and purchased the head bandana.

The kids are very happy with their costumes and can't wait to go trick-or-treating! What will your kids be this year?
Saturday, August 27, 2011
Cool Pencil Pouch!
My son had a hard time finding a pencil pouch he liked for school this year, so we bought a plain one with plans of making it much cooler. I've been practicing my hand embroidering and wanted to give it a try as we turned a plain black and gray pencil pouch into a really cool pencil pouch featuring his favorite book character!
I printed out pictures from the internet and pinned them to the pouch. Then, using embroidery floss, I stitched right over top of the design on the paper. When I was finished, I just tore off the paper leaving only the stitching behind. I think it turned out looking really cool! My son is really excited as well and can't wait to show it off on his first day of school!


I printed out pictures from the internet and pinned them to the pouch. Then, using embroidery floss, I stitched right over top of the design on the paper. When I was finished, I just tore off the paper leaving only the stitching behind. I think it turned out looking really cool! My son is really excited as well and can't wait to show it off on his first day of school!


Saturday, August 6, 2011
Back to School - Repurposed Shirt
Every year before my kids head back to school, I drag the big totes out of the eaves that contain all their fall and winter clothing. We pull everything out, try things on, and see what we might need to replace since we've outgrown things.
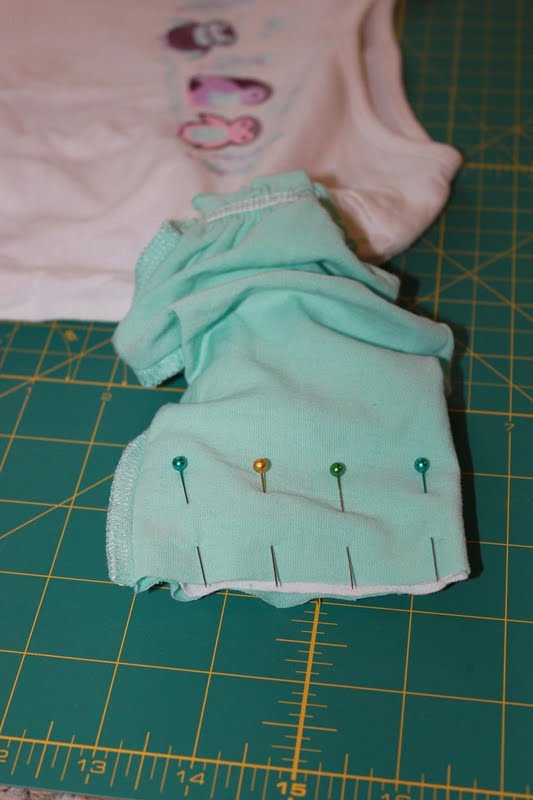
Trying to save a little money this year, I decided to look through the pile of outgrown clothing and see if there was anything I could repurpose. One thing that caught my eye, was this simple but cute penguin shirt. My daughter and I both loved this shirt, but the long sleeves had become too short on her this year. But paired with the sleeves of another too small shirt, we might be able to get another season of life out of it.


Then, I turned the blue sleeves inside out, slipped them onto the white sleeves and pinned them in place.

I used a straight stitch to sew the sleeves together. When I was finished, I removed the pins and pulled the blue sleeves down and right side out.

Although the length of this shirt was still ok, I thought it couldn't hurt to add a little hem from the blue shirt to match the blue sleeves we added. So I cut the bottom hem off the blue shirt, plus a few inches.

Again, I pinned this into place along the bottom hem of the white penguin shirt, and sewed the two hems together with a straight stitch.

I think it turned out really cute! And I'm glad we were able to save another shirt for another year!


Trying to save a little money this year, I decided to look through the pile of outgrown clothing and see if there was anything I could repurpose. One thing that caught my eye, was this simple but cute penguin shirt. My daughter and I both loved this shirt, but the long sleeves had become too short on her this year. But paired with the sleeves of another too small shirt, we might be able to get another season of life out of it.

So, I took the blue shirt and cut the sleeves off. I cut a straight line across at the arm pit.

Next, I cut the sleeves off the penguin shirt, leaving about 3/4 of the original length of the sleeves.

Then, I turned the blue sleeves inside out, slipped them onto the white sleeves and pinned them in place.
I used a straight stitch to sew the sleeves together. When I was finished, I removed the pins and pulled the blue sleeves down and right side out.

Although the length of this shirt was still ok, I thought it couldn't hurt to add a little hem from the blue shirt to match the blue sleeves we added. So I cut the bottom hem off the blue shirt, plus a few inches.

Again, I pinned this into place along the bottom hem of the white penguin shirt, and sewed the two hems together with a straight stitch.

I think it turned out really cute! And I'm glad we were able to save another shirt for another year!


Wednesday, August 3, 2011
Sticker I Spy
My kids have TONS of stickers! They love getting them, but for some reason they don't like using them, so we have an entire shoe box tote full of stickers. So, I thought I'd put some of these stickers to good use and made I Spy Sticker pages.
They were really simple to put together. I took a piece of cardstock and covered it in stickers. I used a few big ones, filled in a majority of the space with small to medium sized stickers, then filled in the small spots with those really tiny sticker chart stickers. There are easily over 100 stickers on the page.


They were really simple to put together. I took a piece of cardstock and covered it in stickers. I used a few big ones, filled in a majority of the space with small to medium sized stickers, then filled in the small spots with those really tiny sticker chart stickers. There are easily over 100 stickers on the page.


I slipped the cardstock into a page protector. I printed a page that had a list of all the stickers that were on the page and slipped it in the page protector behind the sticker page. This would be a great little game to keep in the car. The older kids can read their list on the back to find things on their own. Or the kids can look at each other's sticker page and tell the other what to find.


What do you spy on our sticker pages?
Sharing at...
Tuesday, August 2, 2011
Blogiversary Winners!
I apologize for the delay in announcing the winners for the Blogiversary Giveaways. I honestly bit off a little more than I could chew, trying to host the giveaways and plan and prepare for my daughter's birthday party. Sorry! But, here are the winners for the three giveaways, chosen using Random.org.


The winner for day #1, the eye spy jar, is...

Random Integer Generator
Here are your random numbers:
1
Timestamp: 2011-08-03 00:05:02 UTC
"Christie said...
I would love to win this for my girls! I keep meaning to make one but never seem to find the time or materials to do it.
July 12, 2011 12:28 PM"
The winner for day #2, the mosaic pot craft kit, is...

Random Integer Generator
Here are your random numbers:
6
Timestamp: 2011-08-03 00:00:55 UTC
"annakim23 said...
This looks like a perfect craft to do with a toddler!
July 14, 2011 10:27 PM"
The winner for day #3, the journal giveaway, is...

Random Integer Generator
Here are your random numbers:
8
Timestamp: 2011-08-06 22:05:10 UTC
"Heidi @ Mom's Crafty Space said...
Here are your random numbers:
8
Timestamp: 2011-08-06 22:05:10 UTC
"Heidi @ Mom's Crafty Space said...
I'm a follower :)
July 21, 2011 12:53 PM "
July 21, 2011 12:53 PM "
Congratulations to all of the winners! Please contact me at themuddyprincess@gmail.com with your full name and mailing address. Please contact me by Thursday, August 4th. If I do not here from the winners by the end of the day on the 4th, I will choose a new winner.
Monday, August 1, 2011
Pirate Princess Birthday Party
My daughter recently celebrated her 5th birthday with a Pirate Princess party. My inspiration came from Jake and the Neverland Pirates, a new show on Disney Junior, and one of her favorites.
I started by making this invitation to send out to all her pirate friends. I found the adorable pirate girl graphics HERE.

With the extreme heat, we knew this year's party would definitely need to revolve around the pool, so the decorations went up around the pool area.
I made the "Pirate Lagoon" sign on a piece of butcher paper and attached it to a hula hoop coverd in black crepe paper. The pink bunting was made from a vinyl shower curtain I bought on clearance at Target. I cut out the triangles and sewed them together.

I purchased the white net from Oriental Trading Company and made the pink/black/white scrap banners with some leftover fabric I had.

I did add this extra bunting and wooden X in our front yard by the mailbox. This would help guests find where X marked the spot for the party!

For the party, we provided some pirate goodies for our guests. Pirate friends who attended, each received a pirate bandana and a handmade eye patch. For the eye patch I purchased stretchy headbands and sewed on a pirate patch shape cut from felt. The pink designs were cut using my Cuttlebug, and attached with sticky dots.


I made newspaper swords for big brother and his friend, following the tutorial at Filth Wizardry. The pirates also decorated a wooden treasure box.


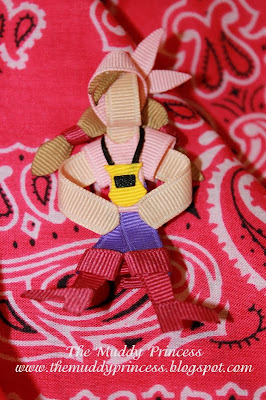
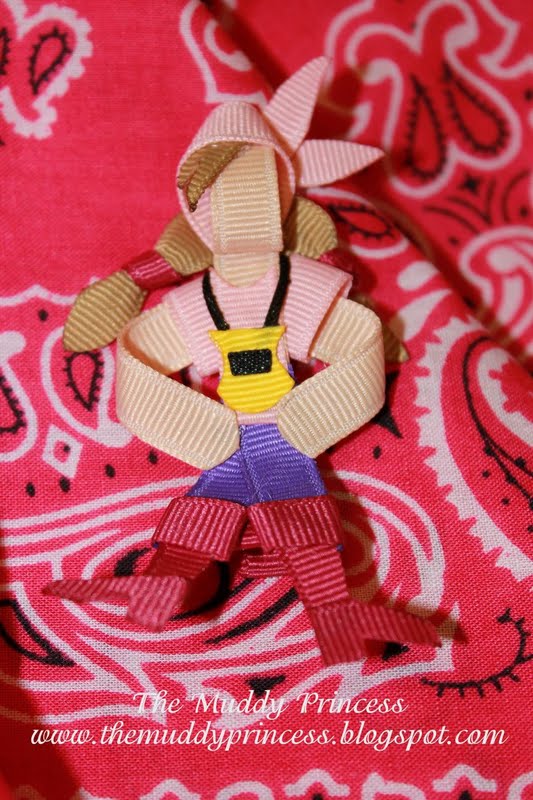
The birthday pirate princess had a special outfit to wear for the day as well. I didn't get many pics of her in this because most of our time was spent in the pool. I made the pirate skirt a while ago and created this shirt to go with it. And Heather, over at Celtic Tide Creations, was kind enough to create this Izzy (from Jake and the Neverland Pirates) hair clip.


Besides lots of giggling and splashing in the pool, the pirate friends also went on a treasure hunt. I made up some clues for the kids to follow. To make them look old, I tore the edges of the paper, then soaked each piece in a bowl of soda and soy sauce. They ended up with this nice vintage looking color.


The pirates found the treasure where X marked the spot - in the sandbox! Then everyone gathered around to collect their loot and add it to their treasure boxes they decorated when they arrived. Treasure included rings, necklaces, pirate coins and tattoos. I even made some of the pretty pink pirate coins into old looking coins for big brother and his friend using gold spray paint and brown acrylic paint.


Of course, no party is complete without a birthday cake. Here is the cake and cupcakes I made. The same graphics I used for the invitations were the same ones I used for the cupcake toppers.


It was a fantastic party had by all! My daughter had a blast celebrating with her pirate princess friends. Seeing all those big bright smiles behind pink frosting covered faces and pink bandana covered heads was all the proof I needed to know, "this was the best birthday ever!" :)
Sharing our party at the following blogs:
Thursday, July 14, 2011
The Muddy Princess Blogiversary and Day 3 Giveaway!
Today is the last day of giveaways and this one is for learning. Back in the Fall, I posted about a Mommy & Me Journal that I created for my son and I to use to write back in forth to one another. It was a great project, because not only did we get to write fun little notes to each other, but it gave my son the opportunity to practice his writing skills.
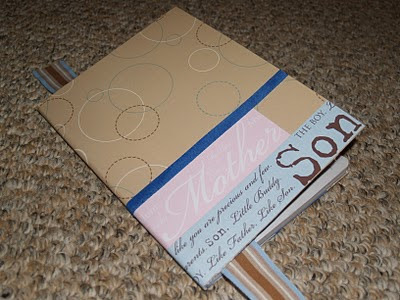
One reader will have the chance to win their own personalized journal. You can choose any combination from the following:
* Mother
* Father
* Son
* Daughter
* Brother
* Sister
I did Mother and Son, since my son was in the first grade and becoming a blossoming writer. But you could also do Mother and Daughter or even Brother and Sister. If you win, the choice is yours!
You have 3 chances to enter.
* For your first entry (mandatory), post a comment telling me why you'd like to win this journal and who you would have it made for.
* For your second entry (optional), become a follower of The Muddy Princess blog and post a comment telling me you are a follower.
* For your third entry (optional), "like" The Muddy Princess page on Facebook and post a comment telling me you like the FB page.
Entries will be accepted untilSunday, July 17, 2011 Thursday, July 21, 2011 at 12:00 pm (noon), EST. Winners will be announced here at the blog on Monday, July 18th Friday, July 22, 2011. Winners will have 48 hours to contact me with their mailing information. If I do not hear from the winners within that time, a new winner will be selected.
And don't forget to check out the giveaways for Day 1 and Day 2! Good luck!
One reader will have the chance to win their own personalized journal. You can choose any combination from the following:
* Mother
* Father
* Son
* Daughter
* Brother
* Sister
I did Mother and Son, since my son was in the first grade and becoming a blossoming writer. But you could also do Mother and Daughter or even Brother and Sister. If you win, the choice is yours!
You have 3 chances to enter.
* For your first entry (mandatory), post a comment telling me why you'd like to win this journal and who you would have it made for.
* For your second entry (optional), become a follower of The Muddy Princess blog and post a comment telling me you are a follower.
* For your third entry (optional), "like" The Muddy Princess page on Facebook and post a comment telling me you like the FB page.
Entries will be accepted until
And don't forget to check out the giveaways for Day 1 and Day 2! Good luck!
Wednesday, July 13, 2011
Glitter Toes
Now that we are totally into flip-flop season, I wanted to share this very cute way to glam up your toenails for the summer! Creating glitter toes is fairly simple, but the results are really pretty.
I started by putting a clear base coat on my toenails, then sprinkling craft glitter on top. Make sure you have a piece of paper or paper towel underneath your feet to catch the extra glitter. Only do 1-2 toes at a time, so the glitter can stick and the polish doesn't dry too quickly. After you have the glitter applied to all your toes, give them 5-10 minutes to dry and set up, then apply a clear top coat. I recommend keeping one bottle of top coat just for glitter toes, since some of the glitter will stick to your brush and end up in your top coat.
I used a basic fine craft glitter and it was easy to apply. I have almost every color of the rainbow, so I'll have to try another color soon. Glitter toes are easy to create and really fun to wear! What color glitter toes will you wear?
![]()
![]()
I started by putting a clear base coat on my toenails, then sprinkling craft glitter on top. Make sure you have a piece of paper or paper towel underneath your feet to catch the extra glitter. Only do 1-2 toes at a time, so the glitter can stick and the polish doesn't dry too quickly. After you have the glitter applied to all your toes, give them 5-10 minutes to dry and set up, then apply a clear top coat. I recommend keeping one bottle of top coat just for glitter toes, since some of the glitter will stick to your brush and end up in your top coat.
I used a basic fine craft glitter and it was easy to apply. I have almost every color of the rainbow, so I'll have to try another color soon. Glitter toes are easy to create and really fun to wear! What color glitter toes will you wear?


The Muddy Princess Blogiversary and Day 2 Giveaway!
It's day 2 of celebrating my one year blogiversary and today's giveaway prize is for crafting. Remember THIS post about the simple faux mosaic pots I did with my kids? Well, one reader will win a mosaic pot craft kit to make one of their very own! The mosaic pot craft kit will include one terra cotta pot and saucer, one bag of Crayola model magic clay and a bag of various stones/gems/sequins to decorate your pot.
![]()
* For your first entry (mandatory), post a comment telling me why you'd like to win this mosaic pot craft kit.
* For your second entry (optional), become a follower of The Muddy Princess blog and post a comment telling me you are a follower.
* For your third entry (optional), "like" The Muddy Princess page on Facebook and post a comment telling me you like the FB page.
Entries will be accepted untilSunday, July 17, 2011 Thursday, July 21, 2011 at 12:00 pm (noon), EST. Winners will be announced here at the blog on Monday, July 18th Friday, July 22, 2011. Winners will have 48 hours to contact me with their mailing information. If I do not hear from the winners within that time, a new winner will be selected.
Did you miss yesterday's giveaway? You still have time to enter that one too! Check it our HERE and good luck!
You have 3 chances to enter.
* For your first entry (mandatory), post a comment telling me why you'd like to win this mosaic pot craft kit.
* For your second entry (optional), become a follower of The Muddy Princess blog and post a comment telling me you are a follower.
* For your third entry (optional), "like" The Muddy Princess page on Facebook and post a comment telling me you like the FB page.
Entries will be accepted until
Did you miss yesterday's giveaway? You still have time to enter that one too! Check it our HERE and good luck!
Subscribe to:
Posts (Atom)


