CLICK HERE FOR FREE BLOGGER TEMPLATES, LINK BUTTONS AND MORE! »

Saturday, September 25, 2010

Handmade Christmas Ornaments

Today is September 25th - that means only 3 more months until Christmas!  And, as promised, today I will start with some fun and easy Christmas crafts.

If you are like me, you start planning well in advance to prepare for Christmas.  Many of the craft stores already have their aisles brimming with holiday stuff, so now is the best time to stock up and get the best selection on Christmas fabrics, supplies and decorations.

Today I am going to share with you my favorite craft to do with my kids each year - handprint/footprint ornaments.  I have been doing one each year since my son's first Christmas, and they have become so much fun to look at each year to see how much the kids have grown.  The kids also get excited to find out what new ornament they will be making.

One of our first ornaments was made from paper, but most are made from craft foam.  It's fun to use, comes in lots of different colors, is not expensive and holds up pretty well from year to year.  You will also need glue and some other decorative supplies like googly eyes, pom poms, pipe cleaners, tiny jingle bells, paint, markers, and ribbon or yarn.

The first handprint ornament I did with my son was a handprint Santa.  We used paint to create his handprint on paper, then decorated with drawing on a face and adding cotton ball fuzz for the hat.  The paper version turned out cute, but is fragile.  When we did this same ornament with my daughter we used craft foam, googly eyes and pom poms.   


One of our favorite ornaments we've done has been the handprint/footprint reindeer.  You use your child's footprint for the head and their handprints for the antlers.  Again, we used craft foam for the handprints and footprints, pom poms and jingle bells for the nose, googly eyes and added a ribbon for hanging.  They are just so cute!  Another year we used just a handprint to make a reindeer, with the thumb being the head and the fingers being the legs. 


The one ornament that makes me cry every time I look at it, is the handprint/footprint angel that I did with my daughter for her first Christmas.  It is so tiny and sweet and reminds me of just how tiny my baby girl was.  For this one, I used Crayola Model Magic clay to make her footprint.  It dries but stays flexible, so I could actually cut her foot shape out of the clay.  We used craft foam for the handprint wings, drew on a simple face and used a very puffy pipe cleaner for the halo.


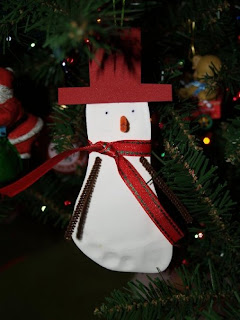
We've come up with two different snowman ornaments.  One uses the footprint as the body of the snowman.  We also used the Crayola Model Magic clay for this one, adding pipe cleaner arms and a nose, a ribbon scarf and a foam hat.  For the second snowman ornament, we used ball ornaments.  I painted my son's hand and he carefully wrapped his hand and fingers around the ball, leaving his handprint.  Once dry, he used paint markers to make each finger (and thumb) look like a little snowman.  This second ornament is definitely geared towards older kids.


One year, I was lucky enough to find a bunch of wooden star ornaments on clearance after the 4th of July at my local craft store.  We used these for our fingerprint penguins.  My son painted each wooden star ornament  After they were dry, he made fingerprints using black and white paint to create these adorable penguins.  Orange craft foam was added for the beak and feet.


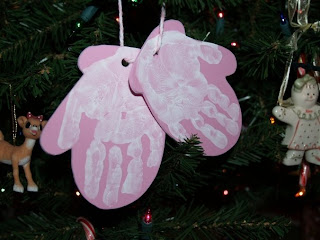
And last, but not least, is our mitten ornament.  We used a mitten cookie cutter to trace the shape onto craft foam.  After cutting out the mitten shapes, I painted my daughter's hand and she put her handprint inside each mitten.  We punched a hole and tied them together.  I'm glad I decided to do this one with her last year, because her hand just fit inside that shape.


These ornaments are so easy to make and make great memories for years to come.  I hope they give you some ideas that you might like to try this holiday season.  I will be back tomorrow to share the poems we paired with each of our ornaments.  Not only did they make a great collection for our own tree, but we loved to share them with other family members as well.


Sharing these fun Christmas crafts:

Wednesday, September 22, 2010

Jumper to Apron

A few weeks ago, I went shopping at a local consignment store that was having an end of summer sale.  You could stuff your bag with as many sale items as you could for just $8.  I managed to find some things for my kids, but also came across a few items that I knew I could do something with.

And one of those items was a girls button down jumper, that was blue with white polka dots.  It was a size 10, so it wouldn't fit my daughter, and was a bit old-fashioned looking.  I recently lost some pics from my computer, but here is a pic of a similar style dress to give you the idea of what I was starting with.


When I saw it, I immediately thought that I could make an old-fashioned style apron.  And that's what I set out to do.  I started by cutting the top part of the dress from the skirted bottom, and cut the skirt down the back so it could lay out flat.


I cut about 4 inches from each side of the skirt and folded each piece right side together.  Then I stitched along the one side and turned them right side out.  These would be the apron ties.


I stitched along the center where the skirt buttons, just to keep it together.


And I hemmed each side for a clean finish.


Last, I hemmed the top part of the skirt with a 1 1/2 inch hem to act as the waist.  I then took the ties I made earlier, inserted them into the open hem and stitched them in place.


I absolutely LOVE how it turned out and how easy it was to complete!  My daughter thinks it's really cute and has already asked me to make her a pink one.  We'll definitely look super cute together with our matching aprons.


Sharing this craft on some other great blogs!

Tuesday, September 21, 2010

ABC Cards Giveaway - Redraw!

Since the first winner did not contact me, I had to do the drawing again.  Please see the updated giveaway post HERE to see if you are the winner!

Chicka Chicka Boom Boom Letter Activity

One of my daughter's favorite books is Chicka Chicka Boom Boom.  And this book worked perfectly today for our letter review.


At my daughter's preschool they will soon be starting their letter of the week, so I wanted to do a quick and fun letter review with her to get her ready.  We pulled out our copy of the book and some sticky foam letters. 


We pulled out one of each letter and as we read the story I had her match up the uppercase letter stickers to the lowercase letters in the book (we just sat them on the page, we did not stick them).  She did really well with this!


After we finished reading, she created her own Chicka Chicka Boom Boom tree using the letter stickers.  I would have her identify a certain letter, then she added it to the tree.


And of course, we couldn't read Chicka Chicka Boom Boom without watching it too!  Last Christmas we bought the Scholastic Video Collection and it was the best money I ever spent.  The DVD with Chicka Chicka Boom Boom is a favorite!

Saturday, September 18, 2010

Bottle Ghosts

I saw this idea on another blog, but can't remember where (thank you so much for sharing your idea though).  I thought it was a really cute way to recycle something and make it into something useful.  And you can never have enough cute Halloween decorations!

I started off with some clean, white plastic bottles.  Most of these are milk jugs from McDonalds, and the others are from orange juice, shampoo and drink mix.


I used a marker to sketch a face, then used acrylic paint to fill it in.  I tied some ribbon in Halloween colors to the top of each bottle for a finishing touch.


They even look cute with a battery operated light inside...


These were super easy to make and cost very little.  I love when such simple decorations turn out so cute!

Friday, September 17, 2010

Book Organizer

My kids go through a lot of cereal, so a lot of cereal boxes go right into the recycling bins.  But not this week!  I decided to use a few to create book holders for the books my kids read.

My son has to read every night for homework so we have lots of easy readers laying around.  My daughter is beginning to show interest in reading, so we have a lot of phonics readers and handmade books around.  Unfortunately, the basket I was planning on using to hold the books hasn't quite been working.


So I took a few cereal boxes and cut them diagonally like a magazine holder.


Then using a combination of spray adhesive and tape, I attached some leftover wrapping paper to each one to make them look cool for the kiddos.


And added labels so the kids could easily find their books.


This was a quick and easy way to organize our books and didn't cost me a thing!

Thursday, September 16, 2010

Crayola Dry Erase Poster

I saw the neatest thing at Target today in the school clearance aisle - Crayola Dry Erase poster!


There are a couple of things that I liked about this:
* you can stick it anywhere, remove it and stick it someplace else
* it's dry erase with crayons, so no stinky smell of dry erase markers
* it has writing lines on it to help with letter practice
* it's big - 17" x 24"
* it was only $2.48


I thought this would be a great way for my daughter to practice writing her name and her letters & numbers.  It would also be helpful for my son when he's practicing his sight words (spelling and writing sentences) and doing math sentences.  It really has so many possibilities, and for the small price tag you can't go wrong!  I got two - one for the kids' work table and one to put on the wall.

Sunday, September 12, 2010

Twine Vase

Sorry for the delay in craftiness!  With school starting, we've been working on getting back into our routines.  Then, the dreaded head cold hit our house, and we're still recovering.  But, now I'm back and ready to share a few fun crafts with you!

With Fall right around the corner, I'm eager to start pulling out my fall decorations and taking the time to create a few new ones.  I have a really pretty, but simple collection of fall foilage I like to display in a vase.  I have a bunch of plain glass vases to use, but was trying to think of a way to pretty them up a bit.

Then I came across a roll of twine in our junk drawer. We used to use it to tie up our newspaper for recycling, but it's just been sitting in the drawer unused. I can put it to good use! Plain vase + twine = pretty vase!


To get started, I cleaned and dried my vase and used a piece of large cardboard as my work surface.  I decided the easiest way to adhere the twine to the vase was with my glue gun.  My glue gun has two settings, and because I was working with glass I chose the lower setting.

I started at the bottom of the vase, gluing the twine around the surface.  I used the glue to cover continuously for the first 2-3 layers just to be sure things stayed in place.


After I got the first few layers complete I continued to wrap the twine around the vase, but now gluing every 2 inches or so.  At the end, I used a larger twine (sissal) to accent the top and bottom of the vase.  This was a very tedious task, taking me two days to complete.  I burned my fingers plenty of times too, but I got just the look I was going for.


I love the rustic look to the vase!  Not only will it work perfectly for Fall, but it will definitely blend in to our country-style home.


Sharing this fun fall project at some awesome craft blogs:

Wednesday, September 8, 2010

ABC Cards - Who Won?

It's time to find out the winner of the ABC sandpaper cards! 
I assigned each comment a number as follows:

mommy2fivekidz, 1 & 2
Christina, 3 & 4
Christie, 5 & 6
Cheryl888, 7 & 8
Caroline Sugarman, 9 & 10
Meghan R., 11 & 12
Melinda, 13 & 14
our.life.with.twins, 15 & 16
SolDucky, 17 & 18
welcome to our wonderland, 19 & 20

And used random.org to pick our winner (this is the second drawing, since the first winner did not contact me).
 
 
And the winner is...
SolDucky!
 
 
Congratulations!  Please contact me at themuddyprincess@gmail.com with your name and mailing address so I can get the cards to you as soon as possible for your little one to try!

Winners have 7 days to contact me with their information for mailing out the prize.  If I do not hear from you, I will redo the drawing to choose a new winner.  Thanks!