CLICK HERE FOR FREE BLOGGER TEMPLATES, LINK BUTTONS AND MORE! »

Thursday, July 14, 2011

The Muddy Princess Blogiversary and Day 3 Giveaway!

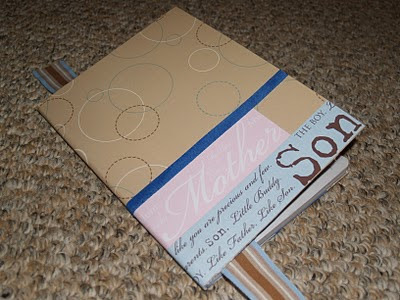
Today is the last day of giveaways and this one is for learning.  Back in the Fall, I posted about a Mommy & Me Journal that I created for my son and I to use to write back in forth to one another.  It was a great project, because not only did we get to write fun little notes to each other, but it gave my son the opportunity to practice his writing skills. 


One reader will have the chance to win their own personalized journal.  You can choose any combination from the following:
* Mother
* Father
* Son
* Daughter
* Brother
* Sister

I did Mother and Son, since my son was in the first grade and becoming a blossoming writer.  But you could also do Mother and Daughter or even Brother and Sister.  If you win, the choice is yours!


You have 3 chances to enter.

* For your first entry (mandatory), post a comment telling me why you'd like to win this journal and who you would have it made for.
* For your second entry (optional), become a follower of The Muddy Princess blog and post a comment telling me you are a follower.
* For your third entry (optional), "like" The Muddy Princess page on Facebook and post a comment telling me you like the FB page.

Entries will be accepted until Sunday, July 17, 2011 Thursday, July 21, 2011 at 12:00 pm (noon), EST. Winners will be announced here at the blog on Monday, July 18th Friday, July 22, 2011. Winners will have 48 hours to contact me with their mailing information. If I do not hear from the winners within that time, a new winner will be selected.

And don't forget to check out the giveaways for Day 1 and Day 2!  Good luck!

Wednesday, July 13, 2011

Glitter Toes

Now that we are totally into flip-flop season, I wanted to share this very cute way to glam up your toenails for the summer!  Creating glitter toes is fairly simple, but the results are really pretty. 

I started by putting a clear base coat on my toenails, then sprinkling craft glitter on top.  Make sure you have a piece of paper or paper towel underneath your feet to catch the extra glitter.  Only do 1-2 toes at a time, so the glitter can stick and the polish doesn't dry too quickly.  After you have the glitter applied to all your toes, give them 5-10 minutes to dry and set up, then apply a clear top coat.  I recommend keeping one bottle of top coat just for glitter toes, since some of the glitter will stick to your brush and end up in your top coat.

I used a basic fine craft glitter and it was easy to apply.  I have almost every color of the rainbow, so I'll have to try another color soon.  Glitter toes are easy to create and really fun to wear!  What color glitter toes will you wear?


The Muddy Princess Blogiversary and Day 2 Giveaway!

It's day 2 of celebrating my one year blogiversary and today's giveaway prize is for crafting.  Remember THIS post about the simple faux mosaic pots I did with my kids?  Well, one reader will win a mosaic pot craft kit to make one of their very own!  The mosaic pot craft kit will include one terra cotta pot and saucer, one bag of Crayola model magic clay and a bag of various stones/gems/sequins to decorate your pot.


You have 3 chances to enter.


* For your first entry (mandatory), post a comment telling me why you'd like to win this mosaic pot craft kit.
* For your second entry (optional), become a follower of The Muddy Princess blog and post a comment telling me you are a follower.
* For your third entry (optional), "like" The Muddy Princess page on Facebook and post a comment telling me you like the FB page.

Entries will be accepted until Sunday, July 17, 2011 Thursday, July 21, 2011 at 12:00 pm (noon), EST. Winners will be announced here at the blog on Monday, July 18th Friday, July 22, 2011. Winners will have 48 hours to contact me with their mailing information. If I do not hear from the winners within that time, a new winner will be selected.

Did you miss yesterday's giveaway?  You still have time to enter that one too!  Check it our HERE and good luck!


Easy Patriotic Treat

These ice cream sandwich treats are easy to make and perfect for any summertime get-together.  All you need is a box of ice cream sandwiches and some red, white and blue sprinkles.  To get better coverage, I cut each sandwich in half, then dipped all the sides into the sprinkles.  Store back in the freezer until you are ready to serve.  Kids already love this ice cream treat, and the sprinkles make them even more fun!

Tuesday, July 12, 2011

The Muddy Princess Blogiversary and Giveaway!

One year ago today, I started my blogging journey.  This first year has been quite the adventure, but I've learned so much about blogging and have been inspired by so many others.  I've met some great mom bloggers, have had some fantastic opportunities, and have even been able to put my craft talents to use for a good cause. 

I wanted to do a little something to celebrate and decided to do a few giveaways.  Here at The Muddy Princess we like to play, craft and learn, so I wanted to help 3 lucky winners do that with our prizes.  Today's giveaway is for playing.

One lucky reader of The Muddy Princess will win this handmade I Spy Jar.  My kids loved these when they were younger!  This I Spy Jar is perfect for the younger crowd, toddler to preschooler.  The jar is also the perfect size to keep in the car or even stash in your bag for emergency entertainment (like waiting in a long line at the grocery store).  This I Spy Jar is filled with rice and 10 different colored items.  There is also a handy card attached to help keep track of the items you are looking for.  The lid has been securely attached, to keep the rice and small items safely inside.


You have 3 chances to enter. 

* For your first entry (mandatory), post a comment telling me why you'd like to win this I Spy Jar.
* For your second entry (optional), become a follower of The Muddy Princess blog and post a comment telling me you are a follower.
* For your third entry (optional), "like" The Muddy Princess page on Facebook and post a comment telling me you like the FB page.

Entries will be accepted until Sunday, July 17, 2011 Thursday, July 21, 2011 at 12:00 pm (noon), EST.  Winners will be announced here at the blog on Monday, July 18th Friday, July 22, 2011.  Winners will have 48 hours to contact me with their mailing information.  If I do not hear from the winners within that time, a new winner will be selected.

I hope you have enjoyed the craftiness that has been supplied here at The Muddy Princess during this first year.  I truly appreciate everyone's support and encouragement and am looking forward to another great year of crafting!

Monday, July 11, 2011

Flag Windsock

Last week was supposed to be week three of our at-home summer camp, but my son attended a half day art camp all week and we just didn't have enough time to work on things.  The week one overview can be found HERE.  But, today I wanted to share with you one of our easy crafts we completed during our week two at-home summer camp.  The theme was America the Beautiful, in honor of the 4th of July.

We made small flag windsocks using only a few supplies - small flag on a stick, toilet paper tube, yarn, glue and masking tape. 


We started by wrapping a piece of masking tape, sticky side facing out, around the tube.  The kids stuck pieces of yarn onto the tape.  These would hang down for the  bottom of the windsock.


After the kids had their yarn in place, we put another piece of tape, sticky side down this time, over top of the yarn to keep it in place.


We also had some leftover foam stars from another project, and the kids decided to use these and tied them onto the yarn.


Next, we ran a line of glue down the length of the tube to hold the flag in place.  These flags are the mini flags on a stick; we just removed the flag from the stick.


Then, we wrapped the flag around the tube, and put a little more glue to keep it in place.


Last, we added one more piece of yarn for hanging, by taping it inside the top part of the tube.


We hung these on our front porch, to help with the drying, but the kids wanted to use them inside to decorate our sunroom.  I think they turned out super cute and would like nice anywhere!


Thursday, June 30, 2011

Uncle Sam Decoration

I made this Uncle Sam decoration ages ago (I can't remember where I saw the idea), but recently thought of making a few more to use as decorations for the summer holidays.  He is actually pretty easy to make.  Here is a list of supplies you will need:
  • terra cotta pot and saucer
  • metal coffee can
  • acrylic paint and brushes
  • floral wire
  • wooden stars
  • hot glue gun
  • painters tape (optional)
I started by painting all of my pieces first.  I painted the saucer blue.  I painted the rim of the pot white and the rest a peachy color; once dry I went back and painted on the simple face.  I painted the can in red and white stripes; to make my stripes nice and neat, I used painters tape.  And I painted both sides of my wooden stars yellow.

After everything had been painted and had a full 24 hours to dry, I glued everything together using epoxy (make sure to use the epoxy in a well ventilated area).  I cut a piece of floral wire long enough to fit around the can, curled it around a pencil, twisted the ends together, and slipped it over the can.  Then I hot glued the wooden stars randomly around the wire.

And that was it!  It's a really cute decoration and has held up really well to being outside for the past 5+ years.  I will sometimes use it as is for a decoration, or add some water and cut flowers to the can.  One year we also filled it with sand, stuck in some sparklers and lit them for a fun backyard bbq party.


Sharing at the following blogs:

Wednesday, June 29, 2011

Summer Camp Week 1 - Camping

This past week we began our first week of at home summer camp.  Our theme was "Camping in our own Backyard" and we fit in lots of fun crafts and activities.  Here is a round up of all the fun!


Summer Reading at the Library
We stopped by our local library branch to pick up our summer reading packets.  We picked out LOTS of good books and started reading right away.  A few of our favorite camping stories we read were Just Me and My Dad by Mercer Mayer, S is for Smores by Helen James, Amelia Bedelia Goes Camping by Peggy Parish, Stella and Roy Go Camping by Ashley Wolff and The Berenstain Bears Go to Camp by Stan & Jan Berenstain.  So far, my son has read 11 books and my daughter has read 8!

Summer Memory Box
I found these CD boxes at my local craft store on clearance for only .50 each!  The kids and I went on a nature walk in our yard to find some items to use to decorate their boxes.  The kids can add momentos and keepsakes to their memory boxes to help remember all the fun they had during their summer vacation.


Bead Bookmark
This bead bookmark will help the kids keep track of all the books they've read this summer.  For every book they read, they get to add a bead to the bookmark.


Camp Sign
Using a piece of cardboard for the sign, the kids decorated their signs with nature items and used beans to spell out their initials.  We punched holes in the top and added some twine to hang the signs.


Firefly Jars
Using a small gravy jar, we poked holes in the lid with a screwdriver to make a firefly jar.  The kids painted pictures on their jars to look like the outdoors with fireflies all around.


Friendship Bracelets
We made friendship bracelets with beads as well as braided ones.

Paint Your Own  Pottery
We visited a local paint your own pottery place to have the kids paint a piece.


Summer Activities Journal
To get our writing juices flowing we started off with this simple journal prompt.  The kids wrote about the activities they were hoping to do this summer.  (Borrowed from my own copy of 50 Month by Month Draw & Write Prompts by Scholastic.)


Roasting Marshmallows
We enjoyed roasting marshmallows by our firepit.


Camping Checklist
We used this camping checklist to help us prepare for our first camping adventure in the backyard.  (Borrowed from my own copy of Kindergarten Homework by CTP.)


Great American Backyard Campout
We participated in the Great American Backyard Campout, and camped out in our backyard.  We've never been camping before and this was a good first try for us.  Everyone did well and is looking forward to our next camping adventure.


This first week we were able to fit in almost all of the activities I had planned.  Most importantly the kids had a blast!  I saved my favorite part for the end.  The kids got to sew a homemade patch onto a bandana.  The bandana will serve as another keepsake of all the fun we had and all the neat things we learned over the summer.  We just did this the other day so I still need to take a pic, but will come back soon to share how they look.

Coming up...Week 2 - America the Beautiful!

Monday, June 20, 2011

Love Knot

My husband and I celebrated 11 years of marriage this year.  When we got married our pastor surprised us with this love knot, a symbol of our marriage.  He took two pieces of string, tied them together and reminded us that no matter how tough things got, the more we might try to pull away from one another, the stronger the knot became.  It was a really sweet token and we've had it tucked away ever since.

I wanted to display the knot in a shadowbox and found the perfect quote to go along with it - "Chains do not hold a marriage together.  It is threads, hundreds of tiny threads, which sew people together through the years."

I pinned some red burlap on the display board and displayed the knot in the shape of a heart.  I printed the quote on some cardstock and pinned that inside the knot heart.


I think it turned out beautifully, albeit 4 months late!  Yes, our anniversary was in February, but I  had a temporary craft block and just couldn't think of the best way to do this.  Anyway, I love it, he loves it and the knot can now be displayed in our home as a reminder of our love. 


Sharing at the following blogs:

Thursday, June 16, 2011

At Home Summer Camp - Sneak Peek

Only one more day of school before our summer vacation officially begins!  I think I'm just as excited as the kids!  A little break from the rushing to and from school, homework and projects will be nice in exchange for carefree, relaxing days by the pool.

But, I know the kids will get restless probably by noon of the first day, so I've created an at home summer camp schedule of fun stuff for us to do.  This is the second year I've done this and it was a BIG help last year in keeping us busy.  The schedule of crafts, activities and learning opportunities is vast, but very flexible.  If we get to it, great; if not, it's ok and we can either move it to another week or save it for next year.  But, at least I have a resource of activities to choose from so we don't get stuck in the rut of watching tv all summer.

Today, I wanted to share a sneak peek with you of what I have planned.  I hope that at the end of each week, I can share with you all the details of our fun.  I assigned each week a theme and included day trips, crafts, recipes and learning activities that revolve around that theme. 

Here is our schedule of themes:

Week of 6/20 - Camping in our own Backyard
Week of 6/27 - America the Beautiful
Week of 7/4 - Weather Around Us
Week of 7/11 - Archaeology
Week of 7/18 - Moving Science
Week of 7/25 - Nature: In the Garden
Week of 8/1 - Beach: Sea Life
Week of 8/8 - Space Exploration
Week of 8/15 - Pioneer Days
Week of 8/22 - Back to School

Some of our day trips, recipes and crafts may change with our themes, but some activities will be a constant each day or week.  Every week, we'll visit our local library to pick up new books for our theme as well as check in for our summer reading program.  And daily (or almost daily) we will make time for some workbook practice, journal writing and reading.


Want a better idea of what we'll be working on for a theme?  Here's a look at our first week's theme of Camping:

Monday
  • visit library for new books and summer reading
  • make a bead bookmark
Tuesday
  • decorate a summer memory box
  • make a personalized name camp sign
Wednesday
  • complete summer activities journal
  • make friendship bracelets and mail them to friends
Thursday
  • make ice cream in a bag
  • weave a summer sun
Friday
  • complete the camping checklist activity
  • make a paper bead necklace
Saturday

I hope you'll join us for some summertime fun with our at home camp ideas!


This blog post is written in memory of Naida Scaggs.
Rest in sweet peace, dear friend.