CLICK HERE FOR FREE BLOGGER TEMPLATES, LINK BUTTONS AND MORE! »

Sunday, February 19, 2012

Diary of a Wimpy Kid Birthday Party

My husband and I have always loved to read, and I'm so glad that my son followed that love of reading.  His favorite books to read are the books of the Diary of a Wimpy Kid series by Jeff Kinney.  He's read all six books, multiple times, so it was no surprise when his 8th birthday rolled around that he wanted to celebrate Wimpy Kid style!


I found some fantastic inspiration on Pinterest and used some party details from different events to create a fun time for my son and his friends.

First, I started with the invitation.  And when I saw THIS cheese invitation from Cap Creations, I knew this was the one we would have to recreate!  I printed our party details onto yellow cardstock, cut them out into 5 inch squares and used my 1 inch hole punch and regular hole punch to add the holes to the cheese slice.  I then went back and used brown, orange and green ink pads to add the gross coloring to the cheese (using a q-tip).  We also included an extra slip of paper telling the guest, "You've got the cheese touch!"


We did a simple color scheme - black and white, like the drawings in the books, with a pop of red, like the color of the first book.  We had black, white and red balloons and I made a felt banner in the same colors with his name.


We even added our own stinky cheese to the front porch.  I took a slice of swiss cheese and colored it with markers.  Unlike the characters in the book, our guests had no problem picking up the cheese to gross everyone out!


My son decided to have a movie party, but we added in a few games to play in the beginning while we waited for all the guests to arrive.  We played Fregley's Sayings.  For this game, each guest received a slip of paper with something that Fregley says.  They had to read it, but their lips had to cover their teeth when they said it.  If you laughed you got eliminated, and the last person standing was the winner.  "Can you chew gum with your belly button?"

We also played the Secret Word game.  For this game, the player needs to get the group to say the secret word on their card, but without saying any of the forbidden words.  For example, one of the secret words was "diary" but the player was not allowed to say book, journal, red, wimpy or kid.

Did you know there were a few event kits released at the time of some of the books' releases that you can download for free?  That's where we found these two games.  You can download the Dog Days Event KitThe Ugly Truth Event Kit, and the Cabin Fever Event Kit.

The last game we played was Mixed Up Wimpy Kids, and my son actually came up with this game idea.  Each player receives a recording sheet and a pencil.  Everyone takes a turn rolling the die.  Each number on the die represents a part of the character they are going to draw.  For example, if they roll a 1, they draw the head.  But since this is the Mixed Up Wimpy Kid game, they roll the die again to find out which character's body part they draw.  We assigned each number on the die a body part and a character from the books.  So, the kids ended up with some crazy mixed up characters with Fregley's head and Rowley's body, wearing Loded Diper t-shirts and sporting mohawks!  Even the names got mixed up!


While watching the movie the kids had pizza.  Then about halfway through, we held an intermission where the kids could fill up treat sacks with popcorn, pretzels, and candy.

After the movie we had cake and ice cream.  Here is the cake I made.  It's a vanilla cake, with cream cheese frosting and covered in fondant.  The lettering, cheese and squares on the top cake are all made of fondant.  The character faces were piped on using royal icing.  The figures holding the letters of his name are actual action figures.


For party favors I made diaries (I mean journals) for each guest.  I bought the little notebooks at the Dollar Tree and covered them with THESE free printables from the Kenner Road blog - they worked out perfectly!
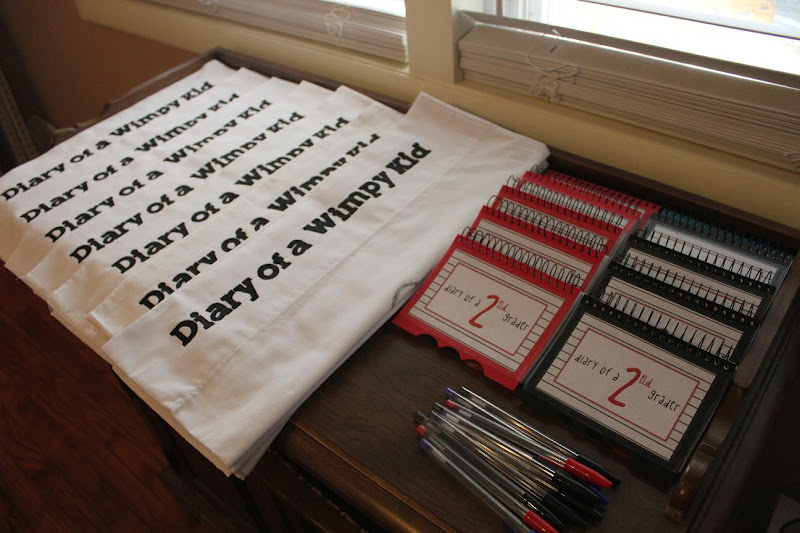


I also created these Diary of a Wimpy Kid pillowcases for each guest.  I bought standard size white pillowcases from Walmart.  I used the freezer paper stencil technique to put "Diary of a Wimpy Kid" along the edge and used the crayon on sandpaper technique to put Greg and Rowley's images in the center of the pillowcase.  These were also a big hit!


The last thing we did was write thank you notes to our guests.  We typed a template for our thank you notes using Greg's thank you notes from the first book.  They were pretty funny and a great end to the Wimpy Party!


If anyone is interested, I can share the files from the Mixed Up Wimpy Kid game.  Files include the directions and recording sheets.  All of the images I just traced onto cardstock from online resources.  Just send me an email at themuddyprincess@gmail.com .

Thursday, February 16, 2012

Teacher's Chocolate Survival Kit

I love my children's teachers!  I guess that's why I volunteered to be room mom for both of my kids' classes this year - yes, I often wonder, what was I thinking; and no, I don't have that much free time, although I like to think I do.

When your children are lucky enough to have caring, dedicated and positive teachers in their lives on a daily basis, it's nice to do a little something for them to show them how much you appreciate all that they do.

I made this teacher's survival kit for my daughter's teacher for American Education Week.  As a former teacher, I remember that week all too well.  It was exciting and stressful all at the same time, but a little treat would surely help a teacher survive any rough patch during that week.

I purchased a plastic jewelry organizer at my local craft store and covered the lid with some pretty scrapbooking paper and adhesive letters.  I added some of the teacher's favorite treats and topped it off with a pretty ribbon.  She loved it!


This would make an easy and sweet gift for a teacher at any time of the year!  I'm thinking of making one for myself to keep at home!

Wednesday, February 8, 2012

Boys Valentine Airplane Tee

I made THIS cute dress for my daughter for Valentine's Day and was trying to find something cool to make for my son.  Ruffly hearts were just not going to cut it for an 8 year old (almost) boy . 

A while ago I found THIS neat shirt on Pinterest, and it became my inspiration for this project.

I made the airplane do a heart loop.  Instant Valentine tee.  An, 8 year old approved, cool, Valentine tee.  YES!


The airplane is made from off white cotton fabric (about 8 pieces stacked together), stitched along the edge for detail to make it look like a paper airplane.  And I hand stitched the airplane's heart loop with black embroidery thread.  This project only took about 30 minutes to complete and didn't cost me anything since we used a plain red tee we already had and I already had the fabric and thread on hand.


Girl's Ruffled Heart Valentine's Day Dress

Wow, it's been like forever since I've posted here at the blog!  Life got hectic and the blog had to be pushed to the back burner.  But with life settling into a better groove, I set a goal for this new year to give a little bit of my time back to blogging.  So, if you've stuck around this long, you might as well stick around a little longer, to see what new crafty adventures I have up my sleeve.

First up, is this adorable ruffled heart dress I made for my daughter for Valentine's Day.  I found the idea on Pinterest.  Don't you just love that place?  I could wallow away the hours pinning.  And although I pin a lot of stuff, I feel like I've been doing a pretty good job at actually doing projects that I pin.  For every 100 projects that I pin, I probably make 1.  That's good, right?  Just say it's good!  :)

So anyway, I saw THIS cute tutorial for making a ruffled heart dress.  Easy to follow instructions and clear pictures to show you step by step what to do.  I was not planning on making the dress, but I did have a denim jumper that needed a little TLC.  It was just kind of blah and I thought that adding the ruffled heart to this jumper would be just the thing to make it fun to wear again.  I used an old red tee for the ruffled heart, the hem of the red tee for the belt and a red chiffon layer from an old dress to add to the bottom of the jumper (it was a little on the short side, so this helped with the length). 


I think it took about an hour to complete.  Now, we have a cute dress to wear for Valentine's Day and were able to repurpose a piece of clothing.

By the way, if you're interested, you can follow me on Pinterest HERE!

Wednesday, November 30, 2011

Handprint Quilt

I just wanted to pop in to share a special gift I made with the help of some fantastic students and a few helping hands of fellow moms.  This handprint quilt was my first quilt and I think it turned out rather well!  A special thank you to Kristen who posted THIS awesome, and very easy to follow tutorial on her blog!


Monday, October 3, 2011

Halloween Costumes

Hi everyone!  If you are reading this, I appreciate you sticking around!  I haven't posted in quite some time because getting ready for and starting life with two kids in elementary school has actually been pretty hectic.  I took on the responsibility of being room mom for both of my children's classes, volunteered to be our school representative for the Trick or Treat for Unicef program, and signed up both kids for after school activities.  So, it's been a little busy trying to get used to our new schedule.

I just wanted to stop in today to share the Halloween costumes I made for my kids' this year.  I can't believe I got them done this early!  My son wanted to be a knight and my daughter wanted to be a pirate princess.

For the knight costume, I used McCalls pattern 5500 to create the "chainmail" shirt, tunic, helmet and shoulder armor.  I created the belt, sword sheath, and boot covers (not pictured) on my own.


For the pirate princess costume, I made the shirt using the peasant blouse tutorial HERE and made the bandana skirt using the tutorial HERE.  I made the striped bloomers and belt on my own, and purchased the head bandana.


The kids are very happy with their costumes and can't wait to go trick-or-treating!  What will your kids be this year?

Saturday, August 27, 2011

Cool Pencil Pouch!

My son had a hard time finding a pencil pouch he liked for school this year, so we bought a plain one with plans of making it much cooler.  I've been practicing my hand embroidering and wanted to give it a try as we turned a plain black and gray pencil pouch into a really cool pencil pouch featuring his favorite book character!

I printed out pictures from the internet and pinned them to the pouch.  Then, using embroidery floss, I stitched right over top of the design on the paper.  When I was finished, I just tore off the paper leaving only the stitching behind.  I think it turned out looking really cool!  My son is really excited as well and can't wait to show it off on his first day of school!


Saturday, August 6, 2011

Back to School - Repurposed Shirt

Every year before my kids head back to school, I drag the big totes out of the eaves that contain all their fall and winter clothing.  We pull everything out, try things on, and see what we might need to replace since we've outgrown things. 

Trying to save a little money this year, I decided to look through the pile of outgrown clothing and see if there was anything I could repurpose.  One thing that caught my eye, was this simple but cute penguin shirt.  My daughter and I both loved this shirt, but the long sleeves had become too short on her this year.  But paired with the sleeves of another too small shirt, we might be able to get another season of life out of it.


So, I took the blue shirt and cut the sleeves off.  I cut a straight line across at the arm pit.


Next, I cut the sleeves off the penguin shirt, leaving about 3/4 of the original length of the sleeves.


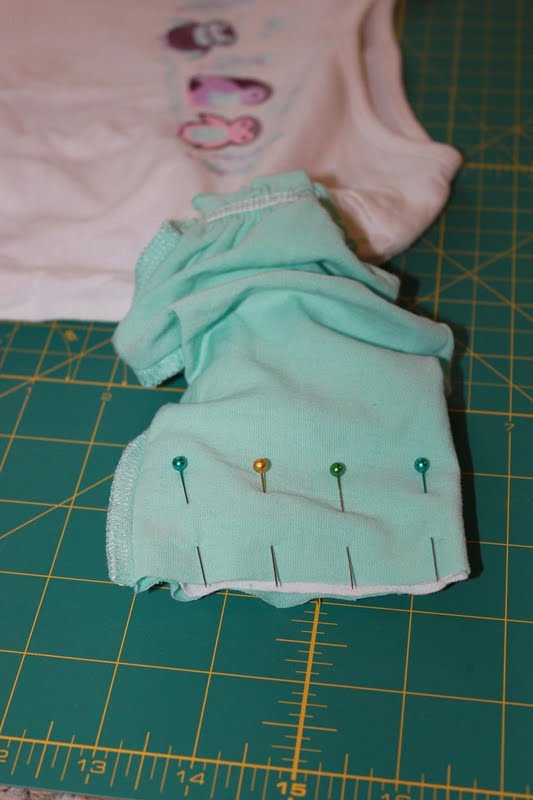
Then, I turned the blue sleeves inside out, slipped them onto the white sleeves and pinned them in place.


I used a straight stitch to sew the sleeves together.  When I was finished, I removed the pins and pulled the blue sleeves down and right side out.


Although the length of this shirt was still ok, I thought it couldn't hurt to add a little hem from the blue shirt to match the blue sleeves we added.  So I cut the bottom hem off the blue shirt, plus a few inches.


Again, I pinned this into place along the bottom hem of the white penguin shirt, and sewed the two hems together with a straight stitch.


I think it turned out really cute!  And I'm glad we were able to save another shirt for another year!


Wednesday, August 3, 2011

Sticker I Spy

My kids have TONS of stickers!  They love getting them, but for some reason they don't like using them, so we have an entire shoe box tote full of stickers.  So, I thought I'd put some of these stickers to good use and made I Spy Sticker pages.

They were really simple to put together.  I took a piece of cardstock and covered it in stickers.  I used a few big ones, filled in a majority of the space with small to medium sized stickers, then filled in the small spots with those really tiny sticker chart stickers.  There are easily over 100 stickers on the page. 


I slipped the cardstock into a page protector.  I printed a page that had a list of all the stickers that were on the page and slipped it in the page protector behind the sticker page.  This would be a great little game to keep in the car.  The older kids can read their list on the back to find things on their own.  Or the kids can look at each other's sticker page and tell the other what to find.


What do you spy on our sticker pages?

Sharing at...

Tuesday, August 2, 2011

Blogiversary Winners!

I apologize for the delay in announcing the winners for the Blogiversary Giveaways.  I honestly bit off a little more than I could chew, trying to host the giveaways and plan and prepare for my daughter's birthday party.  Sorry!  But, here are the winners for the three giveaways, chosen using Random.org.


The winner for day #1, the eye spy jar, is...


Random Integer Generator
Here are your random numbers:
1
Timestamp: 2011-08-03 00:05:02 UTC

"Christie said...
I would love to win this for my girls! I keep meaning to make one but never seem to find the time or materials to do it.
July 12, 2011 12:28 PM"


The winner for day #2, the mosaic pot craft kit, is...


Random Integer Generator
Here are your random numbers:
6
Timestamp: 2011-08-03 00:00:55 UTC

"annakim23 said...
This looks like a perfect craft to do with a toddler!
July 14, 2011 10:27 PM"


The winner for day #3, the journal giveaway, is...


Random Integer Generator
Here are your random numbers:
8
Timestamp: 2011-08-06 22:05:10 UTC


"Heidi @ Mom's Crafty Space said...
I'm a follower :)
July 21, 2011 12:53 PM "

Congratulations to all of the winners!  Please contact me at themuddyprincess@gmail.com with your full name and mailing address.  Please contact me by Thursday, August 4th.  If I do not here from the winners by the end of the day on the 4th, I will choose a new winner.