CLICK HERE FOR FREE BLOGGER TEMPLATES, LINK BUTTONS AND MORE! »
Showing posts with label repurposed clothing. Show all posts

Wednesday, February 8, 2012

Girl's Ruffled Heart Valentine's Day Dress

Wow, it's been like forever since I've posted here at the blog!  Life got hectic and the blog had to be pushed to the back burner.  But with life settling into a better groove, I set a goal for this new year to give a little bit of my time back to blogging.  So, if you've stuck around this long, you might as well stick around a little longer, to see what new crafty adventures I have up my sleeve.

First up, is this adorable ruffled heart dress I made for my daughter for Valentine's Day.  I found the idea on Pinterest.  Don't you just love that place?  I could wallow away the hours pinning.  And although I pin a lot of stuff, I feel like I've been doing a pretty good job at actually doing projects that I pin.  For every 100 projects that I pin, I probably make 1.  That's good, right?  Just say it's good!  :)

So anyway, I saw THIS cute tutorial for making a ruffled heart dress.  Easy to follow instructions and clear pictures to show you step by step what to do.  I was not planning on making the dress, but I did have a denim jumper that needed a little TLC.  It was just kind of blah and I thought that adding the ruffled heart to this jumper would be just the thing to make it fun to wear again.  I used an old red tee for the ruffled heart, the hem of the red tee for the belt and a red chiffon layer from an old dress to add to the bottom of the jumper (it was a little on the short side, so this helped with the length). 


I think it took about an hour to complete.  Now, we have a cute dress to wear for Valentine's Day and were able to repurpose a piece of clothing.

By the way, if you're interested, you can follow me on Pinterest HERE!

Saturday, August 6, 2011

Back to School - Repurposed Shirt

Every year before my kids head back to school, I drag the big totes out of the eaves that contain all their fall and winter clothing.  We pull everything out, try things on, and see what we might need to replace since we've outgrown things. 

Trying to save a little money this year, I decided to look through the pile of outgrown clothing and see if there was anything I could repurpose.  One thing that caught my eye, was this simple but cute penguin shirt.  My daughter and I both loved this shirt, but the long sleeves had become too short on her this year.  But paired with the sleeves of another too small shirt, we might be able to get another season of life out of it.


So, I took the blue shirt and cut the sleeves off.  I cut a straight line across at the arm pit.


Next, I cut the sleeves off the penguin shirt, leaving about 3/4 of the original length of the sleeves.


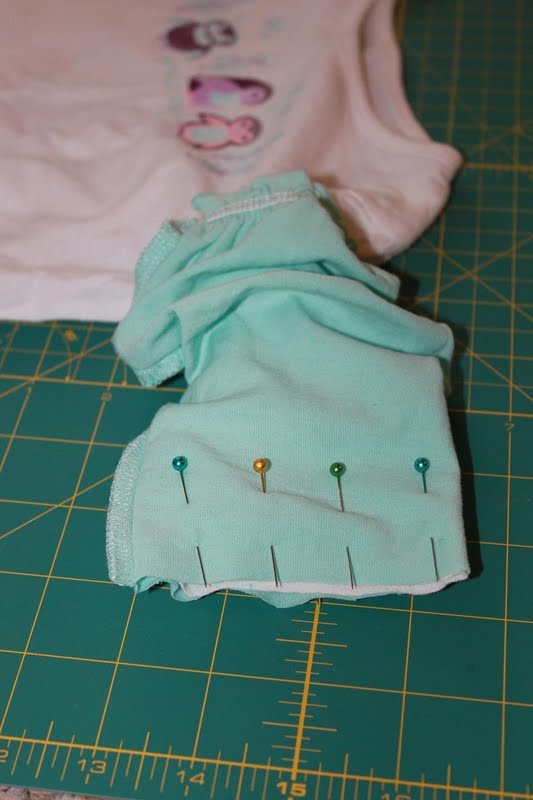
Then, I turned the blue sleeves inside out, slipped them onto the white sleeves and pinned them in place.


I used a straight stitch to sew the sleeves together.  When I was finished, I removed the pins and pulled the blue sleeves down and right side out.


Although the length of this shirt was still ok, I thought it couldn't hurt to add a little hem from the blue shirt to match the blue sleeves we added.  So I cut the bottom hem off the blue shirt, plus a few inches.


Again, I pinned this into place along the bottom hem of the white penguin shirt, and sewed the two hems together with a straight stitch.


I think it turned out really cute!  And I'm glad we were able to save another shirt for another year!


Tuesday, February 8, 2011

New Skirt

I purchased this red sundress from a clearance sale at a local consignment shop.  I really didn't like the style of the dress, but I knew I could do something with the skirted part.  When I was clearing out my daughter's clothing I came across this pair of denim shorts that were too short (but still fit in the waist), and I came up with the idea to put the two together to create a cute little skirt.
 

I started by cutting the skirted part from the dress, leaving about 3 inches at the top for stitching to the shorts.  I don't have a picture to show, but I also removed the threading from the inseam of the shorts so they were completely open. 

Next, I folded the top part of the skirt over twice to create a neat hem and pinned it to the underside of the shorts.  I folded over the bottom of the shorts to create another clean line, and only had to cut a bit of the inseam to create a straight line.  I also restitched the inseam by the front zipper just to keep the fabric together.


Lastly, I  ran a straight stitch all the way around the pinned area.  I added a ribbon belt and a ruffled flower to this new skirt.  I think it turned out really cute and will be a great new addition to my daughter's spring wardrobe. 

Sharing this craft at the following blogs:

Tuesday, October 5, 2010

Sweater Vase

Remember I made that twine vase to pretty up one of my many plain glass vases?  Well, I still have a few plain glass vases and decided to pretty up another one!

This time, I used an old cable knit sweater.  This sweater of mine had been totally spent, just didn't fit well anymore (after a dryer incident), and had a lot of pilling.  But, it was too cute to just throw away, so I decided to repurpose it.


So, I cut off one of the sleeves, slipped it over the vase, and gave my vase a new look!  I used a little spray adhesive to keep the sweater in place and trimmed it up along the bottom.  This was so simple to create and this vase will add a nice textured look to my fall and winter decorations.


Wednesday, September 22, 2010

Jumper to Apron

A few weeks ago, I went shopping at a local consignment store that was having an end of summer sale.  You could stuff your bag with as many sale items as you could for just $8.  I managed to find some things for my kids, but also came across a few items that I knew I could do something with.

And one of those items was a girls button down jumper, that was blue with white polka dots.  It was a size 10, so it wouldn't fit my daughter, and was a bit old-fashioned looking.  I recently lost some pics from my computer, but here is a pic of a similar style dress to give you the idea of what I was starting with.


When I saw it, I immediately thought that I could make an old-fashioned style apron.  And that's what I set out to do.  I started by cutting the top part of the dress from the skirted bottom, and cut the skirt down the back so it could lay out flat.


I cut about 4 inches from each side of the skirt and folded each piece right side together.  Then I stitched along the one side and turned them right side out.  These would be the apron ties.


I stitched along the center where the skirt buttons, just to keep it together.


And I hemmed each side for a clean finish.


Last, I hemmed the top part of the skirt with a 1 1/2 inch hem to act as the waist.  I then took the ties I made earlier, inserted them into the open hem and stitched them in place.


I absolutely LOVE how it turned out and how easy it was to complete!  My daughter thinks it's really cute and has already asked me to make her a pink one.  We'll definitely look super cute together with our matching aprons.


Sharing this craft on some other great blogs!